Vue.js - Study Note 5
Nodejs
Node.js is an open source and cross-platform runtime environment for executing JavaScript code outside of a browser. You need to remember that NodeJS is not a framework and it’s not a programming language. Most of the people are confused and understand it’s a framework or a programming language. We often use Node.js for building back-end services like APIs like Web App or Mobile App.
Install Nodejs
For PC, visit the official website, download the LTS version and install. On windows, the node package manager is known as Chocolatey. It was designed to be a decentralized framework for quickly installing applications and tools that you need.
For Mac, download the link as for PC, or
curl "https://nodejs.org/dist/latest/node-${VERSION:-$(wget -qO- https://nodejs.org/dist/latest/ | sed -nE 's|.*>node-(.*)\.pkg</a>.*|\1|p')}.pkg" > "$HOME/Downloads/node-latest.pkg" && sudo installer -store -pkg "$HOME/Downloads/node-latest.pkg" -target "/"
For Ubuntu,
$ sudo apt update
$ sudo apt install nodejs
$ sudo apt install npm
Check your node version after installing
nodejs -v
Install package with npm
npm i jquery -D // -D: --save-dev, the i is npm-install alias.
Most common and basic commands
npm init -y // boot a project
npm install // install all packages from an existed package.json
npm i packageName@0.0.0 // certain version
npm update packageName // update a package
npm list // list installed packages
npm install webpack --D // install a development dependency
dependencies: Packages required by your application in production.
devDependencies: Packages that are only needed for local development and testing.
Webpack
Webpack is an open-source JavaScript module bundler, It is a module bundler primarily for JavaScript, but it can transform front-end assets like HTML, CSS, and images if the corresponding loaders are included. Webpack takes modules with dependencies and generates static assets representing those modules.
Mode (development vs production)
The development build is used - as the name suggests - for development reasons. You have Source Maps, debugging and often times hot reloading ability in those builds.
The production build, on the other hand, runs in production mode which means this is the code running on your client's machine. The production build runs uglify and builds your source files into one or multiple minimized files. It also extracts CSS and images and of course any other sources you're loading with Webpack. There's also no source maps or hot reloading included.
What specifically separates production from development is dependent on your preferences and requirements, which means it pretty much depends on what you write in your Webpack configuration.
Install:
npm install --save-dev webpack
npm install --save-dev webpack-cli // also this if using webpack4
npm install --global webpack // Global Installation
Main concepts
Entry. The entry point is the module, which webpack uses to start building its internal dependency graph. From there, it determines which other modules and libraries that entry point depends on (directly and indirectly) and includes them in the graph until no dependency is left. By default, the entry property is set to ./src/index.js, but we can specify a different module (or even multiple modules) in the webpack configuration file.
Output. The output property instructs webpack where to emit the bundle(s) and what name to use for that file(s). The default value for this property is ./dist/main.js for the main bundle and ./dist for other generated files — such as images, for example. Of course, we can specify different values in the configuration depending on our needs.
Loaders. By default, webpack only understands JavaScript and JSON files. To process other types of files and convert them into valid modules, webpack uses loaders. Loaders transform the source code of non-JavaScript modules, allowing us to preprocess those files before they’re added to the dependency graph. For example, a loader can transform files from a CoffeeScript language to JavaScript or inline images to data URLs. With loaders we can even import CSS files directly from our JavaScript modules.
Plugins. Plugins are used for any other task that loaders can’t do. They provide us with a wide range of solutions about asset management, bundle minimization and optimization, and so on.
Mode. Typically, when we develop our application we work with two types of source code — one for the development build and one for the production build. Webpack allows us to set which one we want to be produced by changing the mode parameter to development, production or none. This allows webpack to use built-in optimizations corresponding to each environment. The default value is production. The none mode means that there won’t be used any default optimization options. reference
My webpack.config.js for Vue project:
Visit >> Github repository << for whole Webpack4VueTemplate webpack.config.js
const HtmlWebPackPlugin = require("html-webpack-plugin");
const MiniCssExtractPlugin = require("mini-css-extract-plugin");
// const UglifyJsPlugin = require('uglifyjs-webpack-plugin');
const CopyWebpackPlugin = require("copy-webpack-plugin");
const TerserPlugin = require('terser-webpack-plugin');
var path = require('path');
var webpack = require('webpack');
const { VueLoaderPlugin } = require('vue-loader');
const { CleanWebpackPlugin } = require('clean-webpack-plugin');
const isProd = process.env.NODE_ENV === 'production';

function resolve(dir) {
    return path.join(__dirname, '..', dir)
}
const config = {
    target: 'web',
    stats: {
        children: false
    },
    entry: './src/index.js',
    output: {
        path: path.resolve(__dirname, 'dist'),
        publicPath: '/',
        filename: 'bundle.[hash:8].js'
    },
    resolve: {
        extensions: ['.js', '.vue', '.json'],
        alias: {
            '@': resolve('src'),
        }
    },
    optimization: {
        minimizer: [
            new TerserPlugin()
        ],
        splitChunks: {
            chunks(chunk) {
                // exclude `my-excluded-chunk`
                return chunk.name !== 'my-excluded-chunk';
            }
        }
    },
    module: {
        rules: [{
                test: /\.js$/,
                exclude: /node_modules/,
                use: {
                    loader: "babel-loader",
                }
            },
            {
                test: /\.jsx$/,
                loader: 'babel-loader',
            },
            {
                test: /\.html$/,
                use: [{
                    loader: "html-loader",
                    options: { minimize: true }
                }]

            },
            {
                test: /\.(png|svg|jpg|jpeg|gif)$/,
                use: [{
                    loader: 'url-loader',
                    options: {
                        limit: 10000,
                        name: 'static/img/[name].[hash:7].[ext]'
                    }
                }]
            },
            {
                test: /\.css$/,
                use: [
                    "style-loader",
                    "css-loader",
                    // "sass-loader"
                ]
            },
            {
                test: /\.vue$/,
                loader: 'vue-loader',
            },
            {
                test: /\.styl/,
                use: [
                    'style-loader',
                    'css-loader',
                    {
                        loader: 'postcss-loader',
                        options: {
                            sourceMap: true,
                        }
                    },
                    'stylus-loader'
                ]
            },
            {
                test: /\.(mp4|webm|ogg|mp3|wav|flac|aac)(\?.*)?$/,
                loader: 'url-loader',
                options: {
                    limit: 10000,
                    name: 'static/media/[name].[hash:7].[ext]'
                }
            },
            {
                test: /\.(woff2?|eot|ttf|otf)(\?.*)?$/,
                loader: 'url-loader',
                options: {
                    limit: 10000,
                    name: 'static/fonts/[name].[hash:7].[ext]'
                }
            }
        ]
    },
    plugins: [
        new CleanWebpackPlugin(),
        new webpack.DefinePlugin({
            'process.env': {
                NODE_ENV: isProd ? '"production"' : '"development"'
            }
        }),
        new HtmlWebPackPlugin({
            template: path.resolve(__dirname, 'src', 'index.html'),
            filename: "./index.html"
        }),
        // new HtmlWebPackPlugin(),
        new VueLoaderPlugin(),
        new CopyWebpackPlugin([
            { from: "src/assets/data", to: "static/data" },
        ]),
        new MiniCssExtractPlugin({
            filename: "styles.[chunkhash].[name].css",
            chunkFilename: "[id].css",
            ignoreOrder: false, // Enable to remove warnings about conflicting order
        }),
    ],
    devServer: {
        contentBase: path.join(__dirname, "dist"),
        port: 9000,
        historyApiFallback: true,
        // noInfo: true,
        // overlay: true
    },
    performance: {
        hints: false
    },
    devtool: '#cheap-module-eval-source-map',
};
if (isProd) {
    config.output.filename = 'static/js/[name].[chunkhash:8].js';
    config.plugins = (config.plugins || []).concat([
        new webpack.DefinePlugin({
            'process.env': {
                NODE_ENV: '"production"'
            }
        }),
        new webpack.LoaderOptionsPlugin({
            minimize: true
        }),

    ]);
} else {
    config.plugins.push(
        new webpack.HotModuleReplacementPlugin(),
        new webpack.NoEmitOnErrorsPlugin(),
    )
}
module.exports = config;
vue-cli
The CLI (@vue/cli) is a globally installed npm package and provides the vue command in your terminal. It provides the ability to quickly scaffold a new project via vue create, or instantly prototype new ideas via vue serve. You can also manage your projects using a graphical user interface via vue ui. We will walk through what it can do in the next few sections of the guide.
Install
npm i -g vue-cli // cli 2
npm i -g @vue/cli // cli 3
To create a new project, run:
npm i @vue/cli @vue/cli-init // ignore if already installed globally
vue init webpack demo
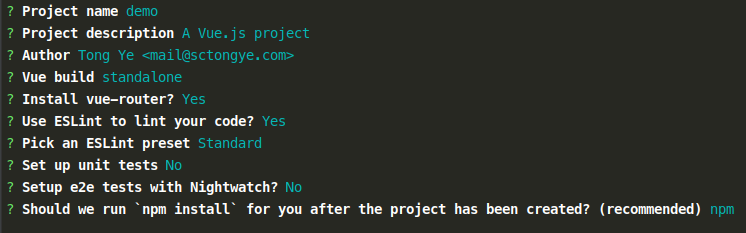
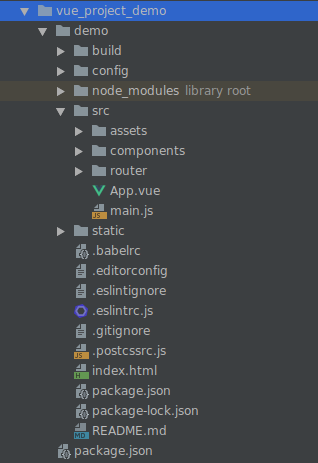
You will be prompted to pick a preset. You can either choose the default preset which comes with a basic Babel + ESLint setup, or select "Manually select features" to pick the features you need. The default setup is great for quickly prototyping a new project, while the manual setup provides more options that are likely needed for more production-oriented projects.
To run project
npm run dev // under "scripts" in package.json